2.14.2017

#EPPwithme no.3 kit


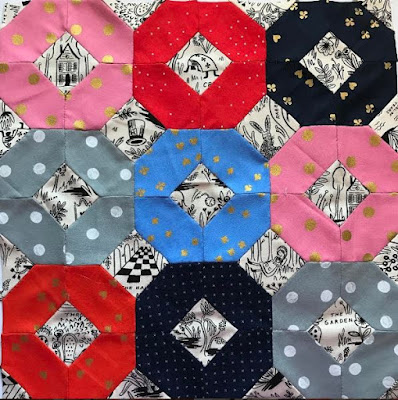
Pluses!  This just might be my all time favorite shape.  When I first started quilting I fell in love with plus quilts. So why EPP pluses when you can sew this design easily using a machine?  Wellllll, two words - FUSSY CUTTING.  


As always, refer to the color sheet included in your kit for the pattern for this block.  TIP:  There are 12 full size plus shapes and 8 single pieces that will fill in the sides.  This layout will give you the 13.5" x 13.5" size that we are aiming for.  

Before cutting into your fabric, plan your block (use the color me sheet!).  The 'flag' or 'house' paper pieces are a great shape for beginner fussy cutting.  Want to learn more about how to fussy cut fabric for EPP?  Check out this fantastic post over on Flossy Teacakes:  How to fussy-cut fabric for English paper piecing (EPP)


Also check out how @jeanaschaaf on Instagram fussy cuts.  What a FAB tip!  


Once you've figured out your fussy cuts, it's time to start piecing the blocks together.  This shape is most easily assembled (also gives you a perfect point!) by sewing 2 pieces together first.  Once you have both halves of the plus assembled, then join.


Don't forget to tag your projects with #EPPwithme !  Each month there is a giveaway and each pic tagged is an entry.  


Finishing #EPPwithme Blocks

Each monthly kit block is designed to be 13.5" x 13.5".  If you complete all 12 monthly blocks in this series, you will be left with enough blocks for a throw size quilt top! 

NOTE:  Keep in mind that how tight you wrap the fabric around your paper pieces can cause some slight measurement differences.  This is not a big deal.  You may or may not need to trim blocks to size because of this slight variation.  

Let's talk sashing!  There are two ways that you can do this.  The first is to wait until all 12 blocks are completed before even thinking about sashing OR add the sashing (and remove those paper pieces!) as you go.  

Sash-As-You-Go Method:
1st you need to determine how big you would like the quilt top to be.  Since there are 12 total blocks, the quilt top will be laid out 3 blocks across and 4 blocks down. For a throw size quilt top (55" x 72"), you will need to add 4" (total) sashing.  Keep in mind that there will be sashing around each block and then you will sew all of the blocks together.  

Cut two, 2.5" x 13.5" pieces of your background/sashing fabric of choice.  Cut two, 2.5" x 17.5" pieces of your background/sashing fabric of choice.  Using a 1/4" seam allowance, sew the 2.5" x 13.5" sashing pieces to each side of the block (then press) and then sew the two 2.5" x 17.5" pieces to the top and bottom of the block.  Press the seams.  Once all sides are sewn, you may remove the paper pieces. 

Sashing Once All 12 Blocks are complete!
If you are like me and will wait to add sashing once all blocks are complete, then there is nothing to do along the way.  Well, except maybe contemplate how big you would like your finished quilt top and what fabric you will use for the background.  Towards the end of this project you will receive instructions on how to finish your quilt top.  

Need help with figuring out sashing/measurements?  Send me an email (brenna@thatmodernfabricshop.com) or message me through Instagram (@thatmoderncrafter).  

MONTHLY GIVEAWAYS!!  Don't forget to tag your progress pics on Instagram using #EPPwithme !  Each post is an entry.  On the last day of the month, I'll select a winner (via random.org).

#EPPwithme no. 2 kit

XOXOXOXOXO


Now that you have mastered hexies, it's time to add in a couple more shapes!  With this kit you will be working with Xs and Os. The X and O shapes are made up of elongated hexagons, squares, side triangles and corner triangles (smaller than the side triangles).

The finished 13.5" x 13.5" block consists of 9, 'O' shapes (three O's per row + three columns).  To begin piecing this block, think about whether you want to highlight the X's or O's (use the color me sheet included in the kit!).  Using your paper pieces as a guide, make templates (click HERE for a quick vid on how I make templates).  Next, cut your fabric and assemble the paper pieces.  You can always make your pieces as you sew too!

While putting the no.2 block together, I quickly realized a preferred 'O' assembly method.  The steps listed below are how I put this block together.  There is no right or wrong way, so if another way suits you best, then go for it!

Assemble the 9, Os.  Start each O by making a "bow-tie" shape.  Sew 2, elongated hexies on opposite sides of a square.  Then add an elongated hexie to the top and then to the bottom.  Repeat until all 9 Os have been assembled.  

Once all of the Os have been assembled, start joining the Os.  Add the side and corner (these are smaller than the side triangles) triangles last.  The 'color me' sheet is your exact pattern so use this as a reference. 


Introducing #EPPwithme and no.1 kit

Welcome to #EPPwithme! 

I am so glad you are joining me on this EPP adventure!  With each kit released, you will you will find a post right here with instructions, tips and a couple tutorials on how to complete your block.  This first month is going to be a little (ok, a lot!) more info since we are just getting started.  I know some of you are very new to English Paper Piecing and I want to make sure you are successful.
Kits are always available for purchase HERE! Each kit includes paper pieces for the block and a color me sheet.  
As with all sewing, there is no right or wrong way as long as you are achieving your end goal and having fun in the process.  My goal for #EPPwithme is to show you how to love EPP and obtain an end result that you are happy with. 
MONTHLY GIVEAWAYS!!  Tag your progress pics on Instagram using #EPPwithme !  Each post is an entry.  On the last day of the month, I'll select a winner (via random.org).
Let's get started!

+ FABRIC PULL +
Quite possibly my favorite part of any project!  Think about what you want your final project to look like. Keep in mind that if you complete all 12 blocks, you will have quilt top!  You can choose a color scheme, a collection or go scrappy.  Since the pieces for each block are somewhat small, this truly is a GREAT scrap buster project!

+ EPP ESSENTIALS +
Check out this Instagram post HERE with a list of some of my favorite EPP tools.

+ PLAN YOUR BLOCK +
In each kit, a color me sheet is provided.  Use this to help plan your block!

+ CUT YOUR FABRIC +
Since the sizes of the pieces used for #EPPwithme are unique, you will want to make your own templates.  I like to use the heavy duty plastic template sheets that can be purchased HERE.
Posted on Instagram is quick tutorial on how to make your own templates.  Click HERE to view.
Some people cut fabric as they go and others (like me!) cut all fabric before starting to sew.
Fussy cutting is SO much fun with EPPing.  We will discuss this more later, but for now, the hexies are a great fussy cutting project!

+ BASTING +
To glue or sew?! The great EPP debate!  Here is a great blog post from Tales of Cloth.  She breaks down the pos/cons of each method and also provides a great tutorial on glue or sew basting.  I personally prefer glue basting and use Elmers Disappearing Purple School Glue sticks.  Biggest tip with glue basting is to not over apply the glue!   In each kit there are a couple of extra paper pieces.  Give each method a practice run and see which one you prefer.

+ SEWING +
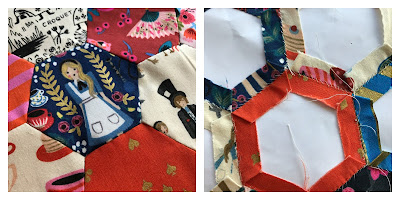
For sewing the pieces together, I prefer the invisible flat back stitch.  Two other stitches that can be used are the whip stitch and the ladder stitch.  I prefer the the invisible flat back stitch b/c you cannot see the stitches from the front.  Take a few moments and watch this VIDEO by TheDIYaddict.  Written instructions can be found HERE. Below is an example of the front and back, using the invisible flat back stitch. 
 + no. 1 KIT INSTRUCTIONS +
Hexies are great first EPP project.  The no. 1 kit includes enough hexies (and half hexies) to complete a 13.5" square block.  Working in columns, the first column with have 5 hexies (flat part of hexie is the top).  The second column, from top to bottom will have 1 half hexie, 4 full hexies and then another half hexie.  Repeat these 2 columns until you have 6 total columns.  Also, refer to the color me sheet for an exact representation of what you block will look like.  You do not have to work in columns.  Just be mindful of your layout. I like to work in sections when sewing hexies together.  I find the project easier to manage this way.  

Dang, that was a LOT of info! Please know that I am here to help!  If you have any questions, please either send me an email or a direct message through Instagram (@thatmoderncrafter).  Don't forget to check out my IG feed.  I'll be posting various tips along the way.  

Thank you so much for joing #EPPwith me !  I am really looking forward to seeing your EPP blocks!