XOXOXOXOXO
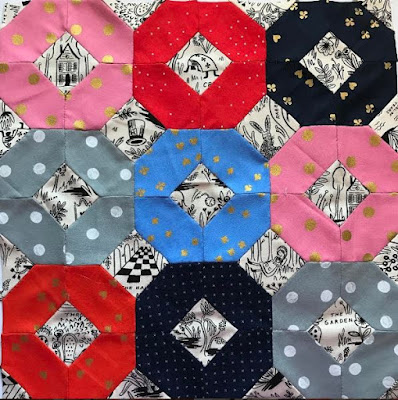
Now that you have mastered hexies, it's time to add in a couple more shapes! With this kit you will be working with Xs and Os. The X and O shapes are made up of elongated hexagons, squares, side triangles and corner triangles (smaller than the side triangles).
The finished 13.5" x 13.5" block consists of 9, 'O' shapes (three O's per row + three columns). To begin piecing this block, think about whether you want to highlight the X's or O's (use the color me sheet included in the kit!). Using your paper pieces as a guide, make templates (click HERE for a quick vid on how I make templates). Next, cut your fabric and assemble the paper pieces. You can always make your pieces as you sew too!
While putting the no.2 block together, I quickly realized a preferred 'O' assembly method. The steps listed below are how I put this block together. There is no right or wrong way, so if another way suits you best, then go for it!
Assemble the 9, Os. Start each O by making a "bow-tie" shape. Sew 2, elongated hexies on opposite sides of a square. Then add an elongated hexie to the top and then to the bottom. Repeat until all 9 Os have been assembled.
Once all of the Os have been assembled, start joining the Os. Add the side and corner (these are smaller than the side triangles) triangles last. The 'color me' sheet is your exact pattern so use this as a reference.


No comments:
Post a Comment