When I first posted a sneak peek of this kit over on Instagram, I could feel the hesitation y'all. Perhaps some of you thought "I'm not ready for clamshells!!". Well, have NO fear, I am here to guide you through EPP-ing clamshells!
Guess what... this is the first time that I worked with clamshells! Prior to diving in, I did a ton of research online and found that there isn't much available. My style of putting these together is most likely a combination of the various tutorials I found.
Let's get started! You will need your #EPPwithme no. 4 kit, fabric and glue. I highly recommend using an acrylic template to cut out your fabric. The templates designed specifically for this kit have a 3/8" seam allowance which is perfect for clams. I also highly recommend glue basting. If you are new to glue basting, check out THIS post on a couple of tips before diving in.
To baste the fabric to the paper piece, (lightly) apply the glue to the fabric edge. Starting from one side of the curve, work your way around, pressing the fabric to the paper piece. When you get to the bottom portion of the clam, I found it helpful to notch (with scissors) the fabric piece so it lays flatter against the curve. You will notice there is a little fabric tail. Leave this as it will not be visible on the front.
Continue basting the rest of your paper pieces. Refer to the color me sheet included in the kit no. 4 for the exact pattern layout.
Now it's time to start sewing these clams together! Finger press the center of each clam. Just the top round "clam" portion. We will come back to this, but it's a very important step.
Take two clams and tack the corners. You will remove this stitch later. You can also use washi tape to hold them together. I found tacking worked better. + NOTE + you only need to do this step on the very first row!
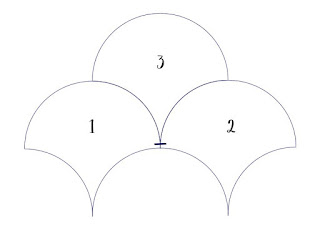
Once you have 2 clams tacked together, you will start to build. Add in the third clam in between clams 1 and 2. The flat back stitch is PERFECT for sewing curves! Make sure to check out THIS tutorial by Karen from TheDIYAddict.com.
Clam 4 will be sewn in just to the right of clam 3. Remember how you are finger pressing the center of each clam? Make sure to line up the center of the clam to the bottom corners.
Once you have the foundation going, you continue to build to the right and of course, up. For my kit no. 4 block, I am choosing to leave the top row full and so I have appliqued a piece of the fabric that I am using for sashing to give me the 13.5" size lock needed. All finished block kits measure 13.5" x 13.5". There are enough paper pieces in the kit to fill an entire 13.5" square. You will have extra paper pieces if you choose to omit the top row (as shown in the below pic).
And, voila, you are now a clamshell master!
Don't forget to tag your projects with #EPPwithme ! Each month there is a giveaway and each pic tagged is an entry.


No comments:
Post a Comment